A LAMPSTARTBOX for sloooow soft-starting tube rigs, which will also save their power switches
Cal wrote:
All:Been contemplating how to save my SX-28 from certain demise. In fact, I've been thinking about this for my other rigs. Here are some proposals: -Build a buck circuit to knock down the line voltage to 110 VAC -Build a combined power switch/zero seeking s/s relay to save the on-board power switch from eventual cyclic failure and the transformer from "initial-on" current surges. Can you think of anything else (besides the usual cap changeout, etc?).
Thanks. Cal, N6KYR.
Ken wrote:
I have thought about similar topics. One thing I have done that seems to work well is to construct a power-up box that I use for most of my tube rigs when I normally play them. It could also work as a substitute for a variac as one initially services a rig that has not operated for some time, or the condition of which is in doubt.
Basically I went to a local Lowes home supply store and bought a nice outdoor household power box, a nice extension ring and 2-hole cover for same, two combination switch/socket units, to make a power switch, series household incandescent lamp box. I also installed a neon bulb in an old time dial lamp jewel in one of the standard holes in the box - this shows partial and full AC power (Neons begin to light at about 60 VAC so it is a crude voltmeter - for full metering of voltage or current, provisions could easily be made).
Here is how it works. You have two switch/socket combinations showing on the face of the box. A 100 watt household incandescent is screwed into one of those little adapters that has a two prong plug on the end for sticking into a wall power plug. This lamp/plug is plugged into the appropriate receptacle on one of the switch/socket units. Internal wiring is such that when the power switch (input power on/off) of the other socket is turned on, ac power is fed to the rig through the light bulb in series while the Neon is across the voltage going to the rig. The rig switch is left on, and power on/off is through the lamp box (this relieves cyclic stress on the rig power switch). As the box is first turned on, the series lamp will light brightly, but then as the caps charge up, it will dim. When it is dimmest, throw the switch on the lamp switch/socket unit which shorts the series lamp, thus giving full ac power to the rig. I even put a Radio Shack mini solar panel across a junk milliammeter set near the series lamp to give calibrated reports of light intensity. When that meter is at its low point, the rig can be brought to full power. Different values of lamps can be installed in the socket for different voltage levels for the soft-start phase. Find the one that gives your rig its best start (bright initial light followed by slow dimming to a stable light level, then go to full power - higher wattage bulbs have less resistance).
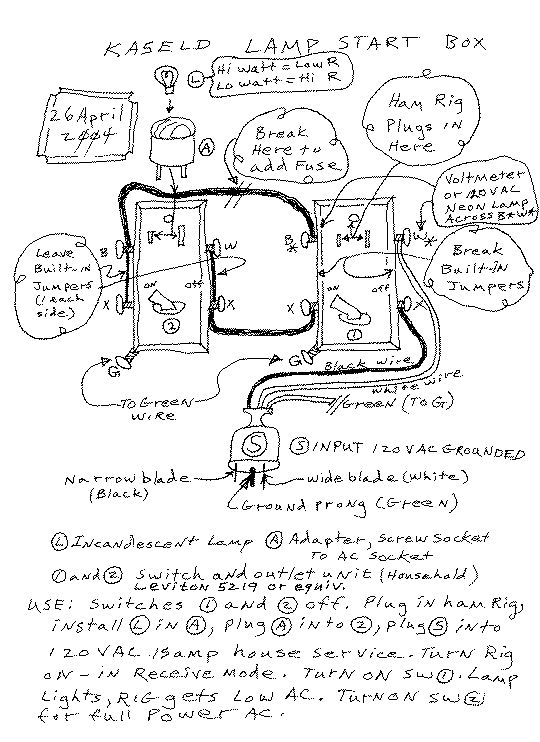
In wiring, never break the white line, use the black line for switching or fuses or bulbs, ground metal parts with the green wire.
The 2 switch/socket units have shorting fins between terminals that can be left or broken to facilitate wiring.
A transformer bucking unit could be wired between the LampStartBox and rig if one desires a lowered final AC level.
Here are the materials I used:
Input AC cord: Bring power to the box through a nice orange power cord with 3 prong male plug, tinned end going to the box.
Box: BWF Mfg. Co, all-weather outdoor box, three hole 1/2, no. TGB-5B, has a nice looking gray paint.
Cover: Two gang extension ring, about 1/2 inch deep, that holds the two switch/socket units, same company, no. EXR-2V, also gray.
Vanity Cover (2 gang): Color as desired.
Two Single Pole Switch with grounding outlet: Levitron 5219 or similar (color to match your chosen vanity cover).
Adapter: Levitron, incandescent screw base to 2-prong male AC power socket.

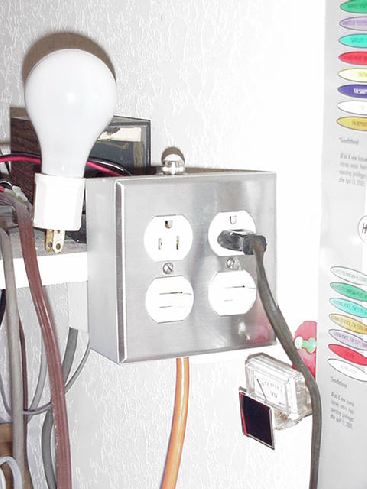
I attach a jpeg of my prototype box (this one lacks the nice extension ring which I recommend). The series lamp and its socket is leaning against the box, but during use it is plugged into the left socket - the switch just below that socket either shorts or opens this left socket).
The orange cord at the bottom is AC power in. The black cord is power cord for my Hallicrafters SR-150 and PS 150. Just below the rig cord is the main box on/off switch. The neon lamp socket is Jbwelded into a top hole. The solar panel/junk meter combo is in the lower right (a little whimsey makes the radios work better). I have only a crude circuit sketch, so if you can? get it all sorted out, send me a Self addressed stamped envelope and I will try to send you a copy of the schematic. (Or maybe someone can draw a better version and scan it.)
- Ken Ketner, KA5ELD, ketner@arisbeassociates.com, http://www.wyttynys.net


HOT LINKS:
Home
|
Search QTH.NET Lists
|
Blast from the Past
|
Photo Archive
|
For Sale/Swap
Click here
to contact webmaster.
Click here
if there is no left-side menu frame.
This page last updated 30 Nov 2024

